Automatically Build and Deploy Your Site using GitHub Actions and Webhooks
In this post I will explain how you can use GitHub to automate the build and deployment processes that you have. I am going to automate the deployment of this site but you can do whatever you want. Just understanding the basics will be enough.
Introduction to GitHub Actions and Webhooks
Let me start by explaining what are GitHub Actions and GitHub Webhooks.
Github Actions is a continuous integration and continuous delivery (CI/CD) platform that allows you to automate your build, test, and deployment pipeline. You can create workflows that build and test every pull request to your repository, or deploy merged pull requests to production.
Webhooks provide a way for notifications to be delivered to an external web server whenever certain actions occur on a repository or organization. … For example, you can configure a webhook to execute whenever:
- A repository is pushed to
- A pull request is opened
- A GitHub Pages site is built
- A new member is added to a team
Defining the problem and solution
As I said, my example will be automating the deployment of this site. Here is the normal workflow of me doing it manually:

As you can see, the only place where my work is really required is writing the post. Other two steps can be automated. We will use GitHub Actions to generate the site content and Webhooks to let our server know about the new content so it can pull the changes. Let’s get started.
Setting up GitHub Actions
Setting up a GitHub Action is as easy as creating a .yml file in .github/workflows/ directory in your repository. Let us create a new action to build our site. Fortunately, there is already a GitHub action to do it for us. Create a file called .github/workflows/jekyll.yml in your root directory of your repository and put the following contents:
name: Jekyll site CI

on:
  push:
    branches: [ main ]
  pull_request:
    branches: [ main ]

jobs:
  build:
    runs-on: ubuntu-latest

    steps:
    - uses: actions/checkout@v2

    - name: Jekyll Actions
      uses: helaili/[email protected]
      with:
        token: ${{ secrets.GITHUB_TOKEN }}
        keep_history: true
        target_branch: 'gh-pages'
That’s it! We have created our first Action. When we push this change, GitHub will start building our site and push the result to gh-pages branch. Currently, it will take a while to build because we don’t use caching. So let’s include it to build faster. Add the following piece as a second step:
# Use GitHub Actions' cache to shorten build times and decrease load on servers
- uses: actions/cache@v2
  with:
    path: vendor/bundle
    key: ${{ runner.os }}-gems-${{ hashFiles('**/Gemfile') }}
    restore-keys: |
      ${{ runner.os }}-gems-
We are done with the Actions part. You can see the final code here. When you are also done with the code, just push it to trigger the action.
Setting up the Webhook and related endpoint
Now that we set up our Action to build the site, we need to let our server know about the changes so that it can pull the changes.
Creating a Webhook from GitHub
To add a Webhook, open your repository in browser and navigate to ‘Settings > Webhooks’ and click ‘Add Webhook’. Fill in the form with appropriate values. Here is an example:
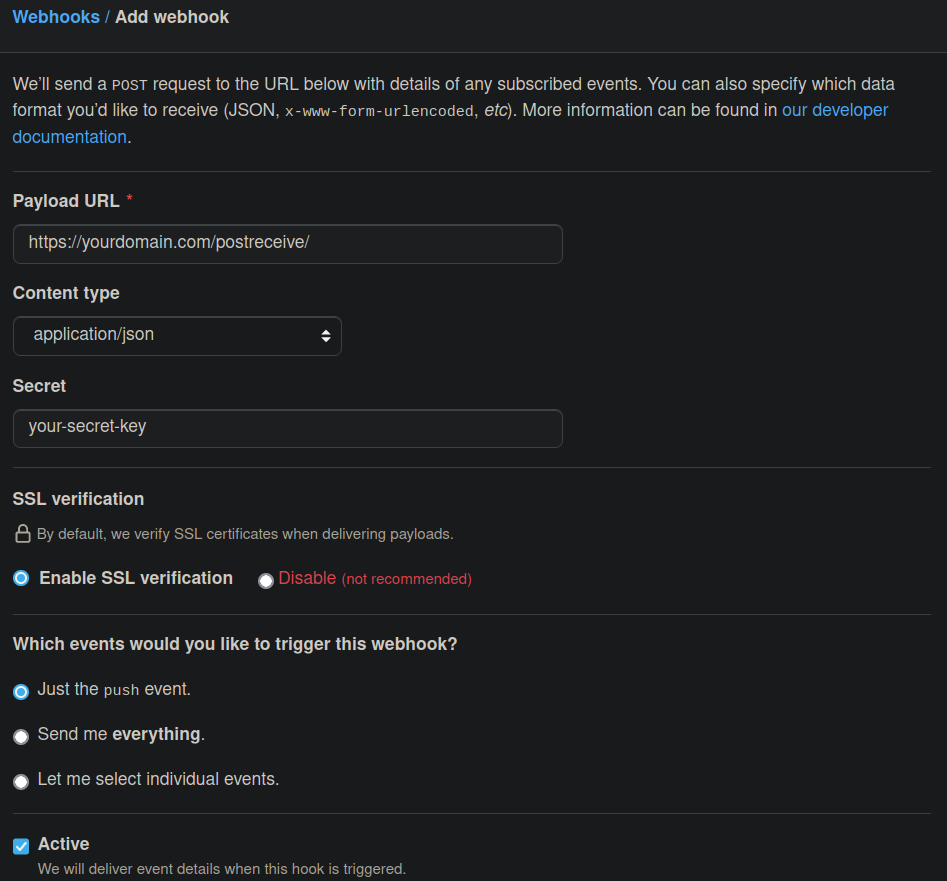
This is all you have to do from GitHub. Now, whenever there is a push event to your repository, GitHub will send a POST request to your payload url with the details.
Note: Our Action is configured to push to a branch in our repository, so it will also trigger this hook and we will catch it.
Creating an endpoint to handle the requests
I will use Flask framework to handle the post requests coming to our endpoint. You can use whatever programming language or framework you want. It will be very simple code with just one job: Validate the secret keys and run a specific code.
Let’s start by creating a new project and a virtual environment:
mdkir post_receiver
cd post_receiver
python3 -m venv venv
source venv/bin/activate
Install the required packages:
pip install Flask gunicorn
Create a new file for storing our environment variables:
# config.py

APP_KEY = "your-secret-key" # same key that is used in github while creating the webhook
PROJECT_PATH = "/path/to/your/project/" # you will want to cd into this path and perform commands such as git pull etc.
And create the Flask application:
# post_receiver.py

import hashlib
import hmac
import subprocess

from flask import Flask, request

import config

application = Flask(__name__)

@application.route('/', methods=['GET', 'POST'])
def index():
    if request.method == 'GET':
        return 'OK'
    elif request.method == 'POST':
        content = request.data
        secret = bytes(config.APP_KEY, 'utf-8')
        digester = hmac.new(secret, content, hashlib.sha256)
        calculated_signature = 'sha256=' + digester.hexdigest()
        actual_signature = request.headers.get('X-Hub-Signature-256')
        if calculated_signature == actual_signature:
            subprocess.Popen(
            ['./perform-git-pull.sh', config.PROJECT_PATH])
            return 'OK'
        else:
            return 'Error'

if __name__ == "__main__":
    application.run(host='0.0.0.0')
I will not go into details explaining what each line does. Basically, we are checking if the request is a POST request and if so we are comparing the secret keys to make sure that the request is coming from GitHub. In our case, this is not too important because when the keys match we are running simple git commands in our repository but you might need it if you are doing something more complicated. And here is the contents of perform-git-pull.sh file:
#!/bin/bash

cd $1
git checkout gh-pages
git pull
We are almost done! All we need to do is create a service to automatically run our code and let nginx handle our endpoint correctly.
Create a new file post_receiver.service in /etc/systemd/system/:
#/etc/systemd/system/post_receiver.service

# change <user> to your actual username
[Unit]
Description=post_receiver
After=network.target multi-user.target

[Service]
User=<user>
Environment="PYTHONPATH=/home/<user>/post_receiver/venv/bin/python"
WorkingDirectory=/home/<user>/post_receiver
ExecStart=/home/<user>/post_receiver/venv/bin/gunicorn -b 127.0.0.1:5000 -w 2 --log-file /home/<user>/post_receiver/post_receiver.log post_receiver

[Install]
WantedBy=multi-user.target
Make sure port 5000 is reachable from outside.
sudo ufw allow 5000
sudo ufw enable
Finally, edit your nginx configuration, /etc/nginx/sites-available/yoursite
location =  /postreceive/ {
    proxy_pass          http://localhost:5000/;
}
Start, restart the services
sudo systemctl daemon-reload
sudo systemctl start post_receiver
sudo systemctl enable post_receiver
sudo systemctl restart nginx
That’s it! curl https://yourdomain.com/postreceive/ should return "OK" and we are ready to accept POST requests from GitHub.
Notes for debugging
In case anything goes wrong, here are a few tips to debug:
- Every GitHub Action produces a log that you can examine. Check them to see if anything is odd.
- In the Webhooks tab, there is a sub-tab called Recent Deliveries. You can take a look at there to see the results of the requests from your hooks.
- You can always test your code locally with
curl:❯ curl -i -X POST -H 'Content-Type: application/json' -d '{"foo": "bar", "bar": "baz"}' https://yourdomain.com/postreceive/
Happy hacking!